This help file explains to you the basics of how to receive data from Pabbly Connect. If you want to learn more about how to send data to Pabbly Connect, take a look at this manual.
Receive Data within a Flows automation
If you are using the Flows feature of WP Webhooks, you can simply select the “Pabbly Connect” integration from the integration dropdown of the trigger. This will generate a receivable URL, which you can use within the “Webhooks” app of Pabbly Connect to send data to your WordPress website.
All of the sent data will then be available within the Flow itself.
Receive Data directly on an action URL
You can also receive data from Pabbly Connect with a direct connection to one of our actions. This allows you to directly communicate with a specific action of your choice.
The WP Webhooks extension within Pabbly Connect
We are offering our own extension within Pabbly Connect, which allows you to create optimized connections to our webhook action URLs. You can use the app to connect with any action of your choice.
You will find our Pabbly Connect extension via the following link: https://staging.wp-webhooks.com/visit/pabbly
How to set up the Pabbly Connect extension
- To get started, please create a new Workflow within Pabbly Connect.
- Once created, please set up the trigger of your choice and add an action.
- Within the newly added action, please search for “Webhooks”and select the WP Webhooks app.
- Once added, you’re promted to add a connection with various values. Down below we explain what each of the values is for and how you can fill it:

How to set up the Pabbly Connect connection
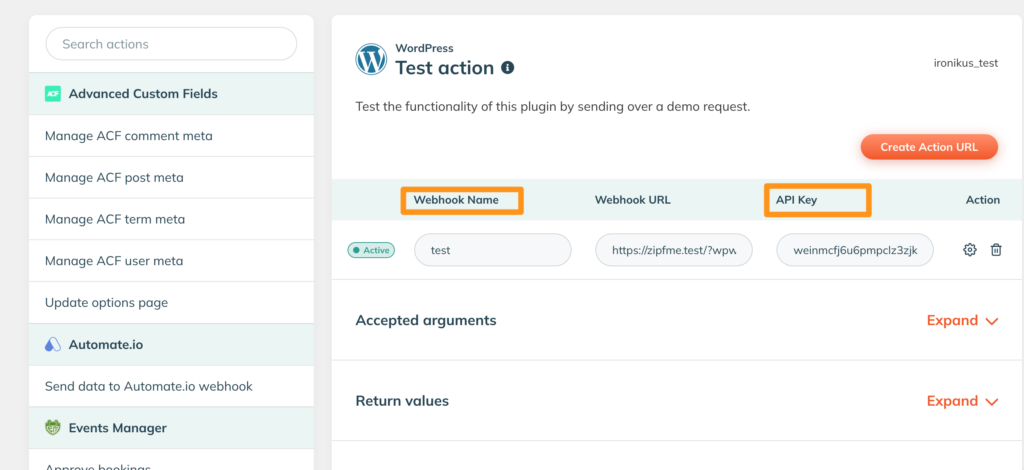
To set up the connection accordingly with its values, you firstly need to locate the action URL within WP Webhooks. You will find it within your WordPress dashboard -> Settings -> WP Webhooks -> Receive Data.
On this page, you will find a list of available webhooks actions for WP Webhooks, along with the possibility to create one based on the action. We recommend creating a new one for the Workflow with your custom webhook name for a better understanding of its purpose.
- New Connection Name
This field is for your own reference to make sure you can address this connection within Pabbly Connect. Adjust it to something useful so you know that the added webhook URL belongs to this connection. - WP Webhook URL
This should contain the URL of the website that you installed WP Webhooks on. E.g. https://yourdomain.com - WP Webhook API Key
- This is the unique token that makes sure your webhook is secure. Please do not share this token with anyone. You will find it within the “Receive Data” tab as seen in the screenshot below.
- WP Webhook Name
This is the name of the webhook URL within the “Receive Data” tab. Please see the screenshot down below.
After that, simply click continue and finalize the connection. Now you are ready to get started with the actual action.
How to set up the Pabbly Connect action
As of now, we created a connection to authenticate Pabbly Connect with your webhook action URL. Now we want to make sure that the connection is directly related to your chosen action.

As seen in the screenshot above, we selected our previously created connection, as well as the action of our choice within the Webhook Action field. Here you can add the action slug of the action you want to use through Pabbly Connect.
You will find a list of all available actions within your WordPress dashboard -> Settings -> WP Webhooks -> Receive Data -> Webhook Actions
Now we accomplished that our module talks directly about our chosen action.
Since, as of now, the connection wouldn’t do anything as we don’t send over any specific values.
To change that, we offer our so-called arguments. This is a list of various attributes that you can use to send data to your chosen action.

In the screenshot above, you can see that we added two different arguments and their respective values of our choice. While those arguments differ for each available webhook action, you might want to use what you desire.
A full list of all arguments is available within the argument list of our plugin under WordPress dashboard -> Settings -> WP Webhooks -> Receive Data -> Webhook Actions
That’s it! After clicking ok, you successfully set up the WP Webhooks module for Pabbly Connect.
In case you would like to see any specific feature, you can request it here.
To access our Pabbly Connect extension you can click on the following link: https://staging.wp-webhooks.com/visit/pabbly